OnGuard Backup - How to use
Real-time backup solution for your Handheld
or Smartphone.Overview
The next generation of backup on the Palm OS.
No longer do you have to worry about scheduling or backup sets, you now
have real-time backup for your important data!
OnGuard Backup
gives you the peace of mind that the backups you keep on the expansion
card are up-to-the-minute current and quickly available to you if need
be. OnGuard Backup works in real-time to automatically backup individual
applications.
You can use OnGuard backup alongside any
other backup software: Keep performing monthly, weekly and daily backups,
but let OnGuard Backup keep your crucial, frequently updated data and
applications backed-up so you won't have to rewrite a single contact,
one meeting or a note again.
Features:
NOTES:
- Minimum system requirement:
Palm OS 5.0
- OnGuard Backup is using the card to backup applications:
Your device MUST have an expansion slot and card or an Internal
Drive (available on selected models).
- To restore applications use OnGuard Restore: See
the menu command Copy OnGuard Restore.
- You can keep OnGuard Restore on the card, but
OnGuard Backup MUST reside in the main memory
(RAM).
- Trial Version Limitations:
- Nag screen (a "Please
register!" alert) appears on each startup / adding new applications.
- You can only add 2
applications to the real-time backup list.
How to Use
Main Dialog
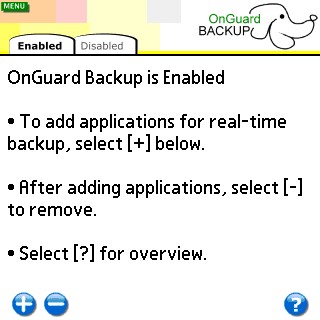
The main OnGuard Backup form lets you add new applications
to OnGuard Backup's backup list.
This will ensure real-time backup (once you exit from one of them) for
the selected applications.
You can also Enable or Disable OnGuard Backup. When OnGuard Backup is
disabled, the selected applications will not be backed-up.
- You can temporarily disable OnGuard Backup by holding
down the page-up button when you exit applications selected for real-time
backup.
Select  to add a new application to OnGuard Backup's real-time backup list: to add a new application to OnGuard Backup's real-time backup list:
| Add Application
screen 1 |
|
Add Application screen 2 |
 |
|
 |
| |
|
|
|
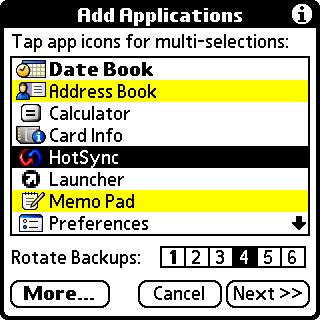
Rotate Backups: [1] [2] [3] [4]
[5] [6]
You can select up to 6 backup copies/sets for each application:
Every time you exit the selected application, all of its files and
settings will be alternately copied to a different directory on
the card:
OnGuardBackup/[appname]
OnGuardBackup/[appname1]
OnGuardBackup/[appname2]
OnGuardBackup/[appname3]
More / Advanced Options:
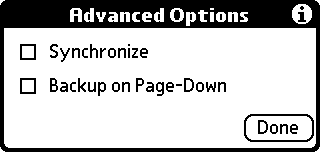
NOTE: Advanced Options are
not saved and must be reselected for each new application added
for real-time backup.
Synchronize: Select this
option to synchronize between the backed-up files (on the card)
and files in the main memory (RAM). When the application is backed-up
(after you exit it); files deleted from the main memory will be
deleted from the card as well. The Synchronize option is meant
to be used with specific applications and you should normally
leave this option unchecked.
Page-Down: Select this
option to backup the selected application ONLY when the
Page-Down button is pressed (when you exit from it).
Usage: Hold the Page-Down button down when you exit from the
selected application and OGB will back it up. Having this option
selected can save valuable time when the application data is not
really changed but OGB still backs it up every time you close
it.
Select the application you'd like
to add and tap Next.
NOTES:
-
Select multiple
applications by tapping the icon on the left of each
application.
-
Selecting Synchronize will slightly
slow the backup process down and should not be selected when working
with most applications.
-
ROM (Read Only Memory)
applications are not backed-up. ROM
files are not affected by loss of power or software failure. ALL
data saved in the main memory (RAM) by the selected application,
regardless if it's ROM or RAM based, will be fully backed-up (see
below for more); only the ROM file (in this case an application
file) will not be backed-up (since it
would have been a needless time consuming task).
-
If the application is already in
the list; selecting it again will update its backup settings to
the chosen backup options.
|
|
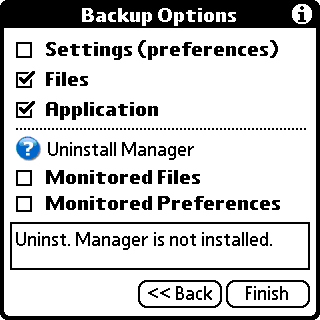
Select from the different backup
options:
-
Settings
- Backup application settings also known as preferences.
-
Preferences are little bits of
data saved in a special location. These settings frequently
change and can contain important information (e.g. registration
codes, game high score info, passwords, etc').
-
NOTE:
Backing-up preferences will cause a tiny slow down when exiting
applications since the preferences are ALWAYS backed-up, as
opposed to files that are only backed-up on change.
-
Files - Backup all files
(databases) associated with the selected application.
-
Application - Backup the
application itself.
-
Monitored Files - Backup
files monitored by Uninstall Manager created when the selected
application(s) was active.
-
Monitored Prefs. - Backup
preferences saved by the selected application(s) under a different
Creator ID than its own (hidden preferences).
Uninstall Manager items -
Notes:
-
To Backup monitored files and
preferences you MUST have Uninstall Manager installed to the
main memory (Uninstall Manager will not work from the expansion
card)
-
You can use Uninstall Manager's
Group Files command
to make sure that certain files are backed-up alongside chosen
applications (e.g. to make sure that the Calendar database is
backed-up after using your 3rd party Calendar replacement app
to add a new meeting, etc).
Learn more in Uninstall Manager's
How to Use and FAQ
Select the desired options and tap
Finish to add the application(s) to OnGuard Backup's real-time
backup list.
|
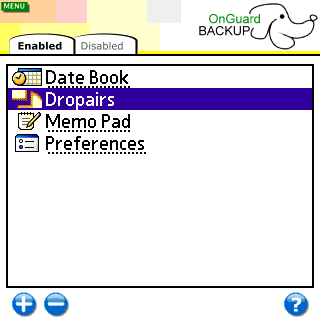
After adding a few applications, OnGuard Backup's list
will show all of the applications that are currently selected for real-time
backup:
Select  to remove applications from real-time backup. After removing applications,
you will also be given the option to delete any previously backed-up files
and preferences from the card. to remove applications from real-time backup. After removing applications,
you will also be given the option to delete any previously backed-up files
and preferences from the card.
Remove Application
dialog
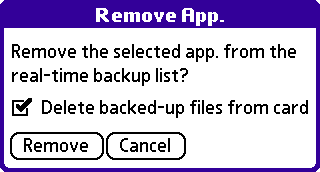
- Check the Delete backed-up files from card
check-box to delete any files that belong to the selected
application and have been previously backed-up to the card (delete
from OnGuard Backup's directory).
Backup using the Menu Command bar icon
You can backup the active application (as long as it
is selected for real-time backup) by showing the menu command bar and
pressing the OnGuard Backup icon (use
FieldPlus when using a Treo based Smartphone).

* You can disable the global command bar integration
from the menu.
Menu
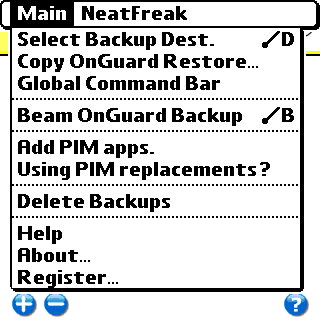
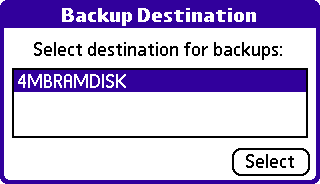
Choose the card to backup the applications
selected for real-time backup to (this option is meant to be used on
devices that have more than one expansion-slot or an internal
drive).
Selecting this menu command will copy OnGuard Backup's
sister application: OnGuard Restore (see below for more) to the expansion
card (to the default application directory; usually Palm/Launcher).
Disable or Enable the global menu command bar
integration that allows you to perform manual backups.
Beam OnGuard
Backup to another Palm device
Select this command to launch Uninstall Manager
(if installed).
This is a shortcut command that will add the 4 default
PIM applications to the real-time backup list: Contacts, Calendar,
Memos and Tasks.
Selecting this menu command will display information
for 3rd party PIM applications users (DateBK5, Agendus, etc).
Select this command to delete ALL previously made
backups from the expansion card. Selecting this option will delete
OnGuard Backup's directory and all of its subfolders and files from
the expansion card.
OnGuard Restore
With OnGuard Restore on your card, you can safely restore
backups made by OnGuard Backup when the time comes.
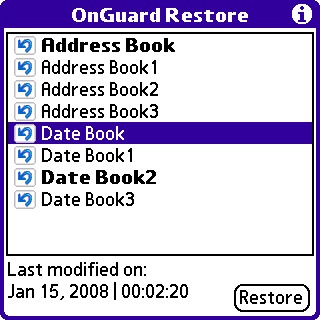
Select a backup set (the application name which
includes all of its files) to see the modification date at the bottom
left corner. This is the modification date of the most recent file in
the backup set, NOT the time the backup was made. Backup sets will
show the same date when they contain the exact same data. The most
recent backup set for each application is displayed using a bold font.
Choose the application you'd like to restore and select
Restore:
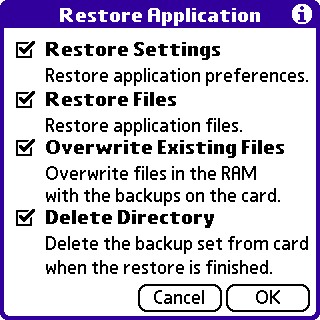
Restore Settings
Selecting this option will restore ALL backed-up settings/preferences:
Preferences associated with the application and preferences monitored
by Uninstall manager (if any of these were selected from the Backup
Options dialog).
Restore Files
Selecting this option will restore ALL backed-up files:
Files associated with the application and files monitored by Uninstall
manager (if any of these were selected from the Backup Options dialog).
Overwrite Existing Files
Overwrite files in the main memory (RAM) with the
backup copies on the card.
Delete Directory
Delete the directory containing the backed-up
files from the card once the restore process completes.
- Selecting applications from the restore list will
show the date and time the most recent file in the current selected
backup/application was changed on (on the device itself), not when
it was backed-up.
- When the restore process completes, you will be
given the option to disable OnGuard Backup real-time backups until
it is launched. This will allow you to make sure you restored the
correct backup set.
|

 to add a new application to OnGuard Backup's real-time backup list:


 to remove applications from real-time backup. After removing applications,
you will also be given the option to delete any previously backed-up files
and preferences from the card.


