|
Uninstall Manager - How to
Use
Garbage is eating up your RAM!
Uninstall Manager saves
valuable memory space while keeping your device clean and trouble-free.
Make sure that newly installed applications will be completely removed
when they are no longer needed.
Uninstall Manager is the most full-featured
uninstaller available for the Palm OS:
Uninstall Manager includes many unique features to help you
stay on top of your software installations:
- Completely remove applications including all of their associated
files and preferences, even hidden ones that are not removed by
any other means.
- Uninstall manager includes an intelligent Real-Sandbox mode which
allows you to install new applications inside completely isolated
environments; launch, evaluate and safely delete applications without
compromising other important data on your device (you can also keep
these "isolated environments" on the expansion card to quickly test
applications in the future).
- Start a Recording, download files from the
internet, receive files from friends (Bluetooth, IR, etc) and copy files
from the expansion card...and with a push of a button you can quickly undo all
changes to your device.
- Group files on the main memory and the
expansion card with different applications and make sure that ALL parts
of the application are deleted when you choose to.
- Uninstall Manager monitors file installations; that besides
allowing you to track your software installation habits will also
make sure that any supporting files installed alongside applications
are removed when you delete the application itself.
-
Uninstall Manager's Timeline view lets you see monitored items
grouped by creation date. You can use this view to quickly find
everything that gets installed onto your device and delete it with a
single step.
- Uninstall Manager allows for uninstallation rollbacks in case you change your
mind! (requires Northglide Undo).
- Use Uninstall Manager's vacuum mode to keep applications
clean as soon as you exit them. The next time you start an application
selected for vacuum mode, it will be as if it was just installed.
- See the user
manual and feature list below for much more...
Features:
- The most full-featured uninstaller available for the Palm OS.
- Monitors applications for saving hidden items.
- Works in the background with no user intervention.
- Monitors file installations using the HotSync® Manager.
- Cleans a68k cache/temporary files.
- Groups all related items together allowing quick and easy uninstallations.
- Group files on the card with RAM based
applications and keep your card clean.
- Sandbox mode: A carefree environment to try out new applications.
- Recording mode: Quickly undo changes to your
device.
- Vacuum mode: Keep applications clean as soon as you exit
them.
- Monitors and deletes files and directories directly from the expansion
card.
- Option to delete directories on the expansion card when deleting applications.
- Deletes RAM based items when uninstalling card
based applications.
- Deletes Card based items when uninstalling RAM
based applications.
- Allows for uninstallation rollbacks in case
you change your mind (requires NG Undo).
- Monitor what gets installed onto your device using
the Timeline view.
- Smart Monitoring: Only monitor true hidden
files.
- Delete protected files that cannot be normally
deleted.
- Completely new Graphical User Interface.
- Support for 320 X 480 Portrait and Landscape modes.
- Context-Sensitive Help - a unique Help Mode.
- Many more usability features.
- Protect Your Assets Now: Uninstall Manager guards your RAM from garbage!
- Available in the Registered Version:
There is no need to open Uninstall Manager to completely delete applications!
(see RDD below for more).
- See below for many more...
Overview
Uninstall Manager's main functionality is to monitor applications for saving
hidden items on your device.
Besides that, UM will also allow you to easily test new applications,
quickly undo changes and will make sure your expansion card is kept tidy.
More about hidden items:
When you launch applications, from the built-in memory or the Expansion Card,
they save data onto your device.
This data is used by the application when active, and normally, will be deleted
when you delete the application itself.
Each and every application on your device has to have a unique Creator ID
which has to be registered with Palm.
Applications, in general, use their Creator ID to tag the data they save (files,
preferences and various settings) on your device. When you choose to delete an application,
the system knows which files and preferences it needs to delete by comparing
them to the application's Creator ID.
However, some applications (intentionally or due to a programming error) save
items under a different Creator ID than their own; these items will remain
on your device, occupying your precious handheld memory for good.
When using Uninstall Manager to uninstall applications, ALL items created
by a certain application will be completely
deleted, including items saved under a different Creator ID, files created
by the application on the card and even files installed alongside the
application.
When trying a lot of shareware
products, your device may already be cluttered with unneeded files and preferences
that are taking up space and may cause problems.
To analyze and get rid of old leftovers that already inhabit your device,
use Cleanup; to prevent your device from being
a victim to future shareware products, use Uninstall Manager.
Notes:
How to Use
When you first launch Uninstall Manager it
will list all applications
in the RAM (main memory).
Your handheld's
Main Memory is where all of your programs store their preferences
(settings) and files. When
you launch applications from expansion card, the application
is first copied into the RAM; when you exit from it (back to the
application launcher), it will be deleted from the RAM, leaving its files and
settings behind for the next time around.
1. Applications List
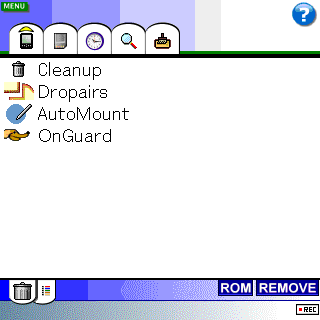
1.1 - To uninstall/delete applications,
select the trash can ("Uninstall") icon:

You can tap the bottom-left part of the screen (the
part shown in red) to select the Uninstall button.
1.2 - To list applications in the ROM (Read
Only Memory), select the ROM button:

The ROM is where the built-in/preinstalled, non-deletable applications reside; applications such as
the Calendar, Contacts, Tasks, etc'.
1.3 - Sort (Name, Size, Creator ID and
Type) the
applications shown on the list by selecting the Sort button:

1.4 - Switch to the context-sensitive
Help Mode by selecting the (?) (question mark)
button:

1.4.1 Help Mode:
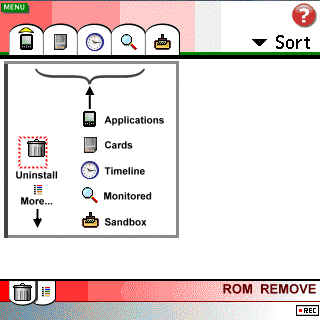
After switching to the Help Mode, tap
(using your stylus) on any screen object or a menu command to see
the relevant information. Exit the Help Mode by selecting/tapping the
(?) button again.
1.5 List Navigation:

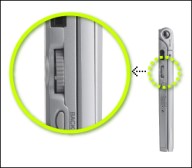
With a
five-way-navigator device: Press the Center button to select items,
Right to show/hide the Items List (see below) and Left to toggle
between views (more on the different views can be found below).

2. Items List
2.1 - To show the Items List and more details about the chosen application,
select the following button:

2.1.1 - Items List:
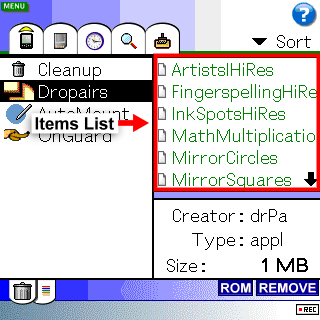
The Items List displays the selected application's associated and monitored items.
2.1.2 What are Items?
Items can be one of the following:
-
Preferences: Preferences/settings are
relatively small pieces of data programs save that later can be easily
accessed when needed. - Palm OS programs
use preferences to quickly store and retrieve their settings at a later
time.
There are two locations available for applications store their
preferences: The Saved Preferences file and the Unsaved
Preferences file. These files are maintained by the system and
from a user standpoint, it doesn't really matter to which one of
these files an application saves its preferences to.
Although the preferences applications save are usually small
in size; if you have many preferences records left by old applications (usually
remnants from Trialware software that were not completely deleted) it can
considerably slow down your Palm Powered handheld.
-
Database Files: All Palm OS specific files, accessible to applications on your device
(pictures, documents, alarms, game level packs, etc'). Each
database file on your device is uniquely identified by its Name,
Creator ID and Type attributes (or a combination of the three).
-
Card Files: Files that are stored
on the expansion card and are not specifically designed to be
solely used on a Palm Powered device (files such as Word
documents, Excel workbooks, JPEG pictures, MP3s, Zip files, etc').
Associated Items are items that share the same
Creator ID (the unique file identifier) with their parent application
and will be deleted when using the default system delete function to
delete the application.
Monitored Items can be one of the following:
-
Items saved by the application under a different
Creator ID than its own.
-
Items grouped with application using the Group
Files command (see below for more).
-
Items installed alongside the application and do not
share its Creator ID.
Monitored Items will be deleted from your device when
using Uninstall Manager to delete applications, or by manually looking
for them using applications such as Cleanup or other file managers.
By grouping all related files and preferences
together, Uninstall Manager helps you to easily delete COMPLETE
applications from your device and expansion card.
-
Besides failing
to delete hidden/unassociated items, the default delete function,
or any other uninstaller available for the Palm OS,
will not search the card for related files.
2.1.3 Items List Legend / Colors
The items on the Items List can be quickly identified
by their color:
Green: Database files.
Purple: Application
files (regular database files that can be launched via the
application launcher, create other files and save preferences).
Black: Preferences.
Example of preferences shown in the Items List:

The item above represents a Saved Preferences resource with the
ID of 0 (zero).
Notes:
- Database files in the ROM (read only memory) are underlined.
- In the Applications view, monitored items will be shown using
bold fonts.
2.1.4 Details Pane
Selecting applications or items will display
relevant information on the Details Pane:
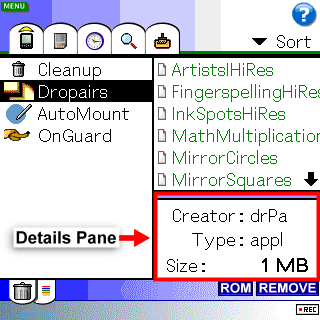
The Details Pane presents information about to the selected
application or item: Its Creator ID, Type and Size.
3.
Deleting Applications
3.1 - Select the application you wish to delete and tap
Uninstall
Check one or all of the following options
and select Delete:
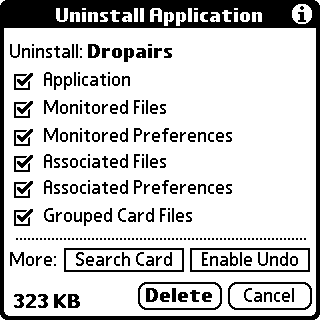
- Application: Delete the application file itself.
- Monitored Files: Delete all files saved by the application
under a different Creator ID than its own. This will also delete ALL
RAM files grouped with the application using the Group Files command
(see below for more).
- Monitored Preferences: Delete all preferences saved by the
application under a different Creator ID than its own.
- Associated Files: Delete all files that share the same
Creator ID with the application.
- Associated Preferences: Delete all preferences that share
the same Creator ID with the application.
- Grouped Card Files: Delete files on the expansion card that
were grouped with the selected application.
More:
- Search Card:
When this option is selected, Uninstall
Manager will search for files on the expansion card that share the same
Creator ID with the application, allowing you to delete them.
Note: This operation could be time consuming depending on
how many folders exist on the expansion card. You can abort the search by
selecting Abort on the subsequent dialog.
- Enable Undo: Create an uninstallation rollback for the selected
application.
The restore point/rollback will be created on the card and
accessible using Northglide Undo.
- Select this option so that you can later change your mind and
quickly restore the application back to your device.
- You must have NG Undo installed in order to
use this function.
3.1.1 - In addition to the above:
-
Uninstall Manager will show a list and allow you to delete
files installed alongside the selected application and are not
associated with it. This is particularly useful if the application you are deleting requires
additional files to function (such as game levels, various database files,
etc). If you install (using the HotSync File Installer) a single
application at a time, all of the displayed files can be safely
deleted.
Example:
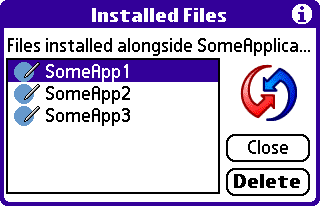
When deleting an application file using this
dialog; you will be able to delete all of its associated items
as well.
Notes:
-
If you only delete the application file itself
(first check-box) and leave the other options unchecked; Uninstall
Manager will later allow you to delete the application's associated
and monitored items via the Monitored Items view (see below for
more).
-
When you delete an application and one of its
Monitored Files or Monitored Preferences belongs to a different
installed application (perhaps you manually grouped the file under
the application that you're now deleting) you will see the following
dialog:
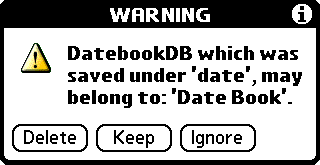
Select Delete to delete this item from your
device even though it appears as if it belongs to a different
application. Select Keep to keep this item in the memory or
Ignore to delete the item and ignore/disable any future
prompts when deleting the current application.
If the item is a preferences resource that belongs
to one of the default PIM applications (Calendar, Contacts, Memos,
etc) then it can be safely deleted since some applications
deliberately use these apps' Creator IDs to hide preferences from
your eyes. Only select Keep if you know that the file is an
important file and you previously grouped it with the application
you are uninstalling (see Group Files for more).
If you select Enable Undo and NG Undo is installed,
you can always quickly restore everything back to the way it was if it
turns out you deleted something you need.
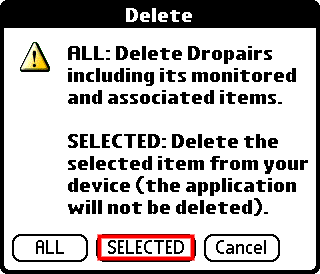
3.2 - To delete a single item; select the item
from the Items List, tap the Uninstall button and then SELECTED:
4. Views
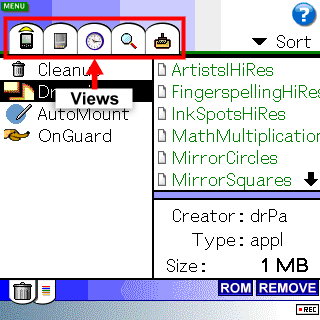
The view discussed until now was the Applications view.
4.1 There are 5 available views to select from:
4.1.1
 Applications Applications
View all existing applications in the
main memory.
Selecting one of the applications will reveal its associated and monitored
items.
4.1.1.1 Remove

Selecting an application and then Remove will
remove ALL of its monitored items. You will also be given the option
to add the application to the Ignore List (see below for more) so
that any future items saved by this application will not be monitored
and added to Uninstall Manager's log file. This will NOT delete ANY
item from your device.
4.1.2
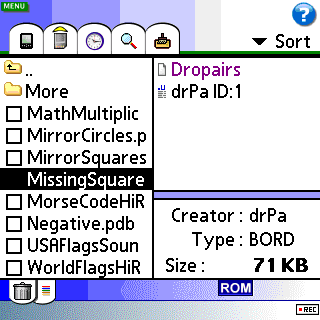
 Cards Cards
Browse installed memory cards on your device and find out which files on
the card are associated with RAM based files and preferences.
By using the Cards view, you can delete files and directories from the expansion card.
4.1.2.1 Delete Card and RAM items in bulk:
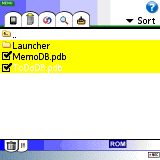
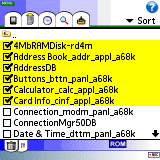
Select multiple files and directories to delete by
tapping the checkbox on the left of each item. Selected items will be
marked in yellow to indicate selection:
4.1.2.2 Notes:
-
Selecting a database file (a typical Palm OS database file, as opposed to
regular file such as a MP3 music file) on the card; a list of all RAM based items saved
under the same Creator ID as that of the file will be displayed. Selecting an application database (.prc) will display and let you delete
its monitored and associated items in the RAM, as if it was selected
from the Applications view.
-
Deleting Empty Directories: When the
directory is empty, select the Uninstall button to delete
it from the card.
4.1.3
 Timeline
The Timeline view lists
all items that were created on your device
grouped by creation date. You can also view only files installed using
the HotSync manager (see below for more).
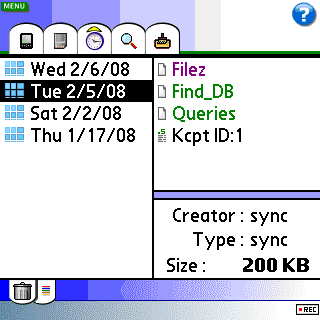
Use the Timeline view to quickly locate and
delete files you've just downloaded from the internet, received via
Bluetooth, etc.
4.1.3.1
 HotSync Installations:
You can set the Timeline view to only
show files that were installed to your device via the HotSync manager.
To change the way the Timeline view acts, please see the Settings
dialog.
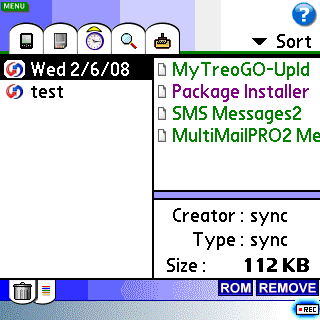
Uninstall Manager logs all files you download via the HotSync Manager
to your device; may that be new programs, documents, pictures or books.
Selecting this option will display groups of files organized by installation
date.
4.1.3.1.1 Remove

Select a group of files installed on the same date
or a single item from the Items List and then select Remove
to remove the item(s) from Uninstall Manager's log file. This will
NOT delete ANY item from your device.
4.1.3.1.2 Rename
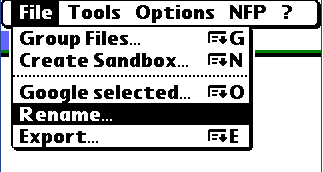
You can select a group of files and then select the menu command
Rename
to change the group's name from the default name of installation
date to a more descriptive one (e.g. "test" in the
screenshot above).
4.1.3.2 Notes:
-
The Timeline view is a great tool to
quickly locate items on your device, and when using the HotSync
only option (see the Settings dialog), you can find out which files belong
to which program and making sure all of the supporting files installed alongside
a 3rd party application are deleted when you delete the application file
itself.
-
You can also use this view to track
your installation habits.
4.1.4
 Monitored
Items Monitored
Items
View ALL monitored items:
 1. Applications that saved items under a Creator ID which is different than
their own Creator ID.
 2.
Files grouped with applications using the Group Files command
(card and RAM).
 3. Leftovers from deleted applications.
 4. Files installed using the HotSync Manager.
4.1.4.1 Remove

Select a group of monitored items (items that belong
to the same application) or a single item from the Items List and
then select Remove to remove the item(s) from Uninstall
Manager's log file. This will NOT delete ANY item from your device.
4.1.5
 Sandbox Sandbox
View saved Sandboxes on the expansion card. You can launch a Sandbox
by using this view and re-evaluate the software. See below for more
information about the Sandbox Mode.
4.1.5.1 Launch Sandbox

Use the Launch Sandbox ("Launch SB") button to to
start the selected Sandbox.
5. Menu
5.1 - Menu >>
File
5.1.1
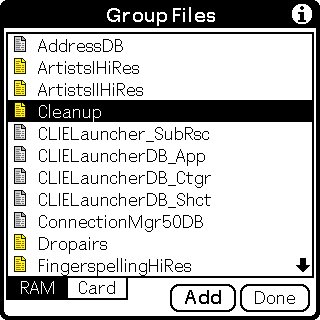
Group Files
Select files to associate with the chosen application.
Use this option to group files under a specified application to allow easier
uninstallations at a later date.
-
Select RAM to group files in the RAM or Card to
group files on the expansion card.
-
If you're using OnGuard Backup, you can use
this option to add different files to applications that are set for
real-time backup
-
To remove files: Switch to the Monitored Items view,
select the file you want to remove and tap the Remove button.
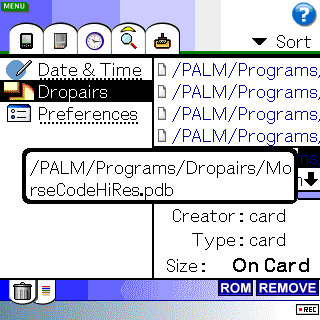
After selecting an application and grouping card
based files; the files will be listed on the Items List:
5.1.2 Create Sandbox:
Create a Sandbox on the card from the
chosen application. Use the Sandbox view to launch the
Sandbox. You must delete the application from the main memory (RAM)
before you can launch the Sandbox.
5.1.3 Turn Vacuum On/Off
AVAILABLE IN THE REGISTERED VERSION
The vacuum mode allows you to keep applications clean
as soon as you exit them. When you start an application selected for
vacuum mode, it will be as if it was just installed. Select an
application from the Applications view and then the Turn Vacuum On/Off
menu command to choose whether to enable or disable the vacuum for the
specific app.
WARNING: Make sure
you know what you're doing! The associated and monitored items of a
chosen app will be deleted without prompt as soon as you exit it
Applications with vacuum mode enabled are shown in
red.
5.1.4 Google Selected:
Open the installed web browser and search for the
selected item using Google (for items selected from the Applications
List or the Items List). This option is meant to be used when running
from Palm Powered Smartphones (such as the Treo 680p, 755p, Centro,
etc).
5.1.5 Rename
See 4.1.3.1.2 above for more.
5.1.6 Export
Export the selected
application, file or group details into a Memo Pad record.
5.2 Menu >> Tools
5.2.1 Start Recording:
Beam files from other devices, use a file manager to
copy files from the card, download files using your internet browser
and press on ANY hardware button or return to UM, to list all the new
files that were added to your device. You will then be able to quickly
delete the files from your device and undo ALL changes.
Notes:
-
The preferences files will be restored as well; new
preferences records will be discarded.
-
Recording Mode is similar to the Sandbox mode (see
below for more), but it is not application-specific and does not
allow you to 'save' the recordings.
-
Running the Sandbox will cancel the recording.
-
You can start the recording from anywhere using a
special shortcut application that can be found in UM's zip file
under the More folder.
You can also start the recording by
selecting the following button:

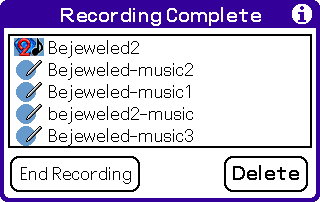
Press on any hardware button to
finish the recording to see the new files that were added to your
device:
5.2.2 Ignore List (advanced):
You can use the Ignore List to instruct Uninstall
Manager to ignore certain items: Ignore ALL items saved by specific
applications, ignore specific items and ignore deleted applications
when the Replace Default Delete option (see below for more) is
selected.
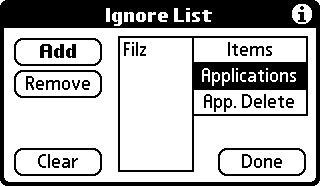
Select Items, Applications or
App. Delete; select the Add button and enter the
Creator ID to ignore:
-
Items: Files and Preferences
saved under this Creator ID will be ignored (will not be monitored
and added to the database).
-
Applications: ALL items
saved by the application with the specified Creator ID will be
ignored.
-
This option is especially useful to avoid monitoring applications that by
definition; create or manipulate other databases with different Creator
IDs (e.g. Filez, JackFlash, Resco Backup or any other backup program, etc.).
-
You can add applications to the Ignore List
without entering Creator IDs by selecting the desired
application from the Applications view and tapping Remove.
5.2.3 Delete 'a68k' Files:
Use this option to delete a68k cache files.
The 'a68k' database is a special RAM-based database that the Palm
OS creates for each application (68K) on your device. This database is created
the first time the application is launched, and stays on the device until
the application is deleted. Occasionally, you need to perform a soft-reset
to delete a particular a68k database. Under certain circumstances an 'a68k'
file can remain on your device. a68k files are small in size.
5.2.4 Refresh Log
Remove non-existing items from Uninstall Manager's log file.
Note: The database will be automatically refreshed every 10th
launch of the program.
5.2.5 Clear Log
Remove all monitored application records from the
log/database file.
Note: Monitored data will be lost.
5.2.6 Beam Uninstall Manager
Use the IR to beam Uninstall Manager to another Palm Powered device.
5.2.7 Soft Reset
Soft-Reset your device. Technical Note: A soft-reset may be needed after uninstallations
to remove Memory Features.
5.3 Menu >> Options
5.3.1
Toggle Icons
Toggle application icons in the Applications List ON or OFF.
5.3.2 Show/Hide Hidden Apps
Show/Hide applications that are not visible in the application
launcher.
5.3.3 Default Settings
Reset all settings to initial values.
5.3.4 Settings
Select the Settings command to show the Settings
dialog:
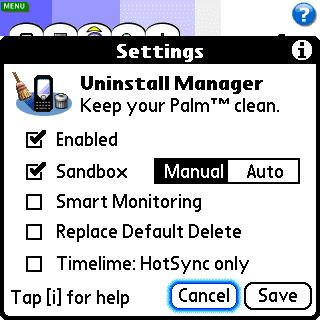
-
Enabled
When this option is checked, Uninstall Manager will monitor applications
for writing preferences and files under a different Creator ID. It is
highly recommended keeping this option checked.
-
Sandbox (see below for more)
Turn the Sandbox
mode ON or OFF
[Auto] - The installed application will be automatically launched inside
the Sandbox once the HotSync process is complete.
[Manual] - Running the application inside the Sandbox will require confirmation.
-
Smart Monitoring
If you're using applications that save files/preferences on top
of other applications (such as hack-like applications and other
applications that are 'always on' e.g. McPhling); having the Smart
Monitoring option selected will minimize monitoring mistakes.
Uninstall Manager will try to determine if a monitored item
(a hidden file/preferences) that was just created belongs to a
different application and will not add it to its log file.
When Smart Monitoring is selected, Uninstall Manager
will not monitor file creations by file
managers when saving files and other applications that manipulate
RAM based databases. Select Smart Monitoring for a less verbose
log file.
-
Replace Default Delete
(RDD)
AVAILABLE IN THE REGISTERED VERSION
When the RDD option is selected, you can keep deleting applications from
your default application launcher and still make sure your device stays
clean.
Whenever you normally delete an application, Uninstall Manager will be
called and you will be given the option to view and delete any hidden
items saved by the application, files installed alongside it,
directories on the expansion card that belong to this application
and any other items grouped with that application.
With RDD
enabled, you don't have to use Uninstall Manager itself to completely
delete applications. Keep deleting applications using your default
application launcher (ZLauncher, Launcher-X, SilverScreen, etc.
When this option is selected, the Timeline view will
only display files that were installed to your device via the
HotSync manager (the same as it was up until Uninstall Manager
v3.16). When this option is not selected, the Timeline view will
display all items grouped by creation date.
5.4 Menu >> NFP (NeatFreak Pack)
Launch other NeatFreak Pack programs, if installed to
the main memory.
As with Uninstall Manager, except Cleanup, all other
NeatFreak Pack programs MUST be installed to the main memory
(RAM) and not to the expansion card in order to function:
- Launch Cleanup
- Launch OnGuard Backup
- Launch Northglide Undo
6.
Sandbox
Keep applications away from your device before you decide to keep them!
When using the Sandbox mode to install new applications, you can quickly
evaluate and completely remove them if you choose to. You can also keep multiple
Sandboxes on the expansion card to quickly retest applications in the future.
When you download a NEW program via the HotSync manager, Uninstall
Manager will show a list of all files installed alongside the application;
when you choose Start, the program will be launched.
When you finish evaluating the program, tap the
Home icon; Uninstall
Manager will list files installed alongside the program, as well as files
created when it was running.
You will then be able to completely uninstall the program or keep it on
your device.
For more:
Sandbox Quick Start Guide
Sandbox Notes:
|


